Learn how to develop websites using Python and Django. In this article, we will talk about programming websites with Python and the Django web framework. Django is one of the best web frameworks for building websites in an easy, fast, and organized way. It is a strong competitor in web development and has gained considerable popularity. We will explain the details throughout this article.
What Is Django?
Django is a web framework that was publicly released in 2005. It is built with Python, which means you should learn Python first and then learn Django. Django's main goal is to make it easier to build complex, database-driven websites.
Once you learn Django, you can build complete websites just as you can with other web technologies. It is a powerful, practical, and easy-to-use framework.
Some Projects and Websites That Have Used Django
-
PBS: an American public television network with hundreds of television and radio stations across the United States.
-
Instagram: a social networking platform for sharing photos and videos.
-
Mozilla Foundation: a nonprofit organization created to support and guide the open-source Mozilla project. It was founded in July 2003 and helps manage development policies, infrastructure, and Mozilla trademarks.
-
The Washington Times: a well-known American daily newspaper published in Washington, D.C.
-
Disqus: an online platform that provides commenting and community discussion systems for websites and forums.
-
NASA: the well-known United States space agency.
-
Dropbox: a very popular cloud storage service.
-
Qoqo Tech: this website itself was programmed using Django.
And many others.
Why Django?
Django has many advantages, including:
-
Easy to use and easy to write code with because it is based on Python.
-
Strong security and continuous updates.
-
Fast development.
-
A clean and organized development structure.
-
Clean, readable code.
Advantages of Django
-
Speed: Turning your ideas into code does not have to take a long time. Django is an excellent solution for developers who focus on productivity and want to finish their work on time without unnecessary complications.
-
Built-in features: Django includes many useful features for user permissions, sitemaps, content management, and much more, all of which help make the development process easier.
-
Security: Django is also strong in this area. It provides solutions for many common problems such as SQL injection, request forgery, and other web vulnerabilities.
-
Versatility: Content management, scientific applications, and many other types of projects can be handled efficiently using Django.
What Is the Best Editor I Can Use?
- Atom: a text editor originally developed by GitHub. It could be downloaded for free and extended with packages for Python and Django development.
- VS Code: A free and widely used code editor developed by Microsoft. It supports Python and Django development through extensions, integrated terminals, debugging tools
How Do I Become a Web Developer?
Web development is generally divided into two main parts: front end and back end. We will explain both step by step.
Most complete websites include both a front end and a back end, so learning both sides helps you build a full website.
-
Front end: the part concerned with the design and user interface. It controls what visitors see and how the website looks.
- Back end: the part responsible for the internal programming and logic of the website. It controls how features, buttons, data, and other functions work behind the scenes.
So, what technologies should you learn to build a website?
For front-end development, you should learn the following technologies:
- HTML
- CSS
- JavaScript
- Bootstrap
After learning the technologies above, you can learn Python and Django for the back end.
- Python through the Django web framework
After learning Python, Django, and the front-end technologies, you can build a complete website. Here is a short explanation of each technology.
- HTML:
- CSS:
-
JavaScript:
-
Bootstrap:
- Python:
What Comes After Programming My Website? How Do I Upload It to Real Hosting?
After finishing your website, the next step is deploying it to web hosting so visitors can access and interact with it. The following steps show one shared-hosting deployment method.
- Buy web hosting. One provider you can use is Namecheap.
- Create your hosting account, purchase the hosting plan, and connect or choose your domain name.
- Then follow the steps below.
-
Step 1:
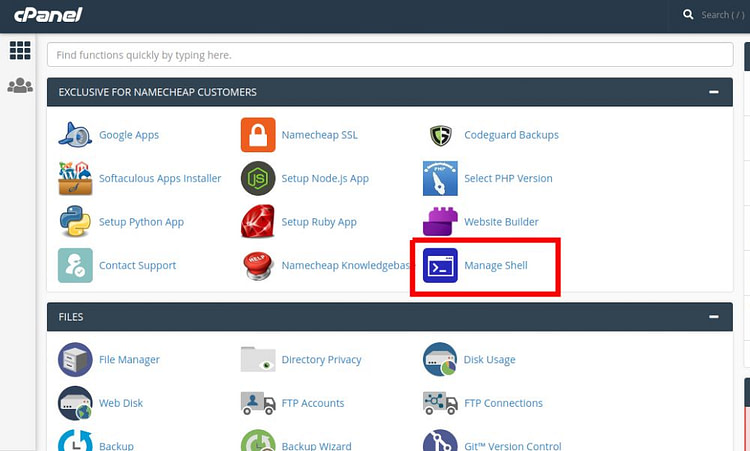
Open your hosting account and enter cPanel. From the available options, choose Manage Shell.
-
Step 2:
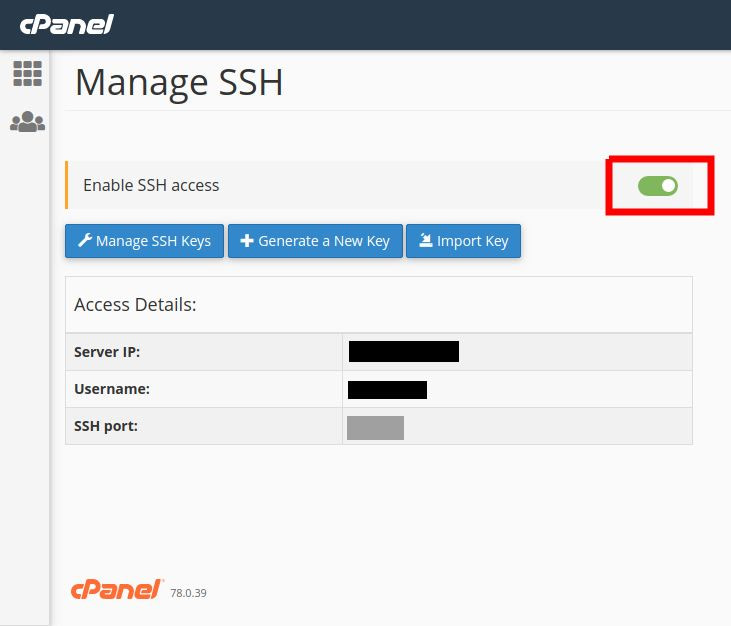
Enable SSH access as shown in the image.
-
Step 3:
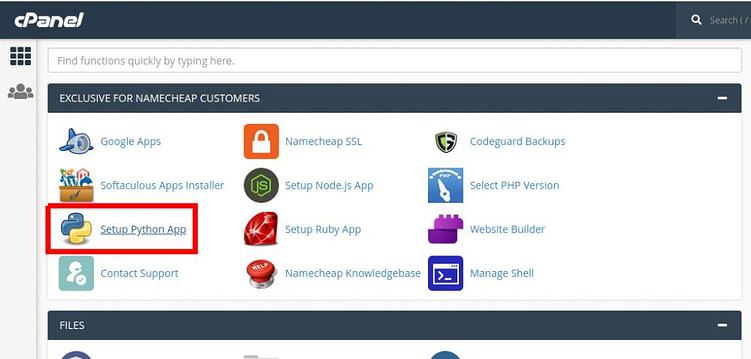
Choose Setup Python App.
-
Step 4:
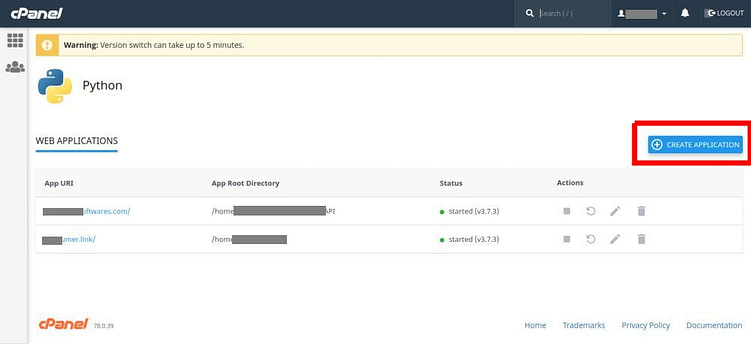
Click Create Application as shown in the image.
-
Step 5:
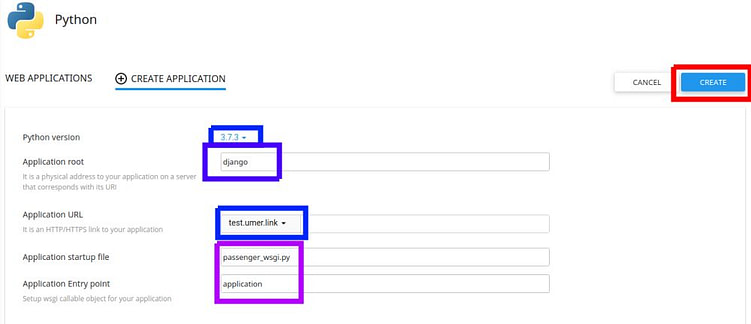
A configuration page will appear. Fill it in as shown in the image and make sure you select the domain you purchased earlier.
-
Step 6:
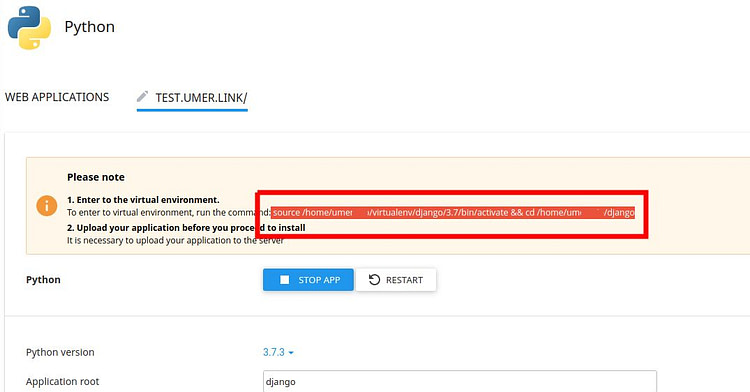
Copy the command shown by cPanel.
-
Step 7:
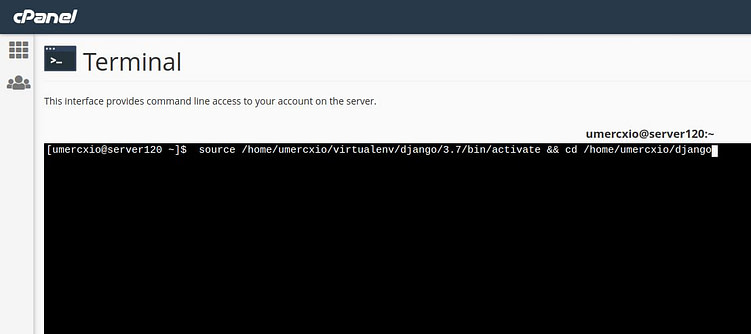
Return to the main cPanel page, open Terminal, paste the command you copied, and press Enter.
-
Step 8:
Now install Django and the packages required by your project. The original version of this guide used Django 2.1 because that was the version supported by that particular shared-hosting setup at the time.
Install the required packages:
pip install django
pip install pymysql
Important notes:
- If your project uses any additional Python package, you must install it on the server as well.
- If package installation fails, verify that the selected Python version is supported by all required packages.
-
Step 9 | Uploading and Running the Project:
Upload your project into the directory you selected as the Python application root in Step 5. In this example, the directory is named django.
Then edit the passenger_wsgi.py file.
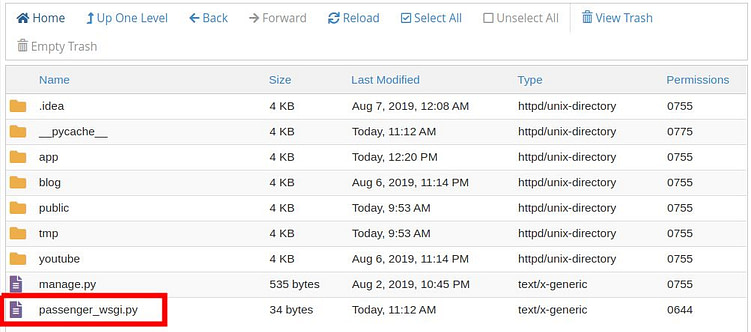
Open it, remove the existing content, and add the following code. You also need to make one small change.
os.environ['DJANGO_SETTINGS_MODULE'] = 'your_project_name.settings'
import os
import sys
sys.path.append(os.getcwd())
os.environ['DJANGO_SETTINGS_MODULE'] = 'your_project_name.settings'
import django.core.handlers.wsgi
from django.core.wsgi import get_wsgi_application
SCRIPT_NAME = os.getcwd()
class PassengerPathInfoFix(object):
    def __init__(self, app):
        self.app = app
    def __call__(self, environ, start_response):
        from urllib.parse import unquote
        environ['SCRIPT_NAME'] = SCRIPT_NAME
        request_uri = unquote(environ['REQUEST_URI'])
        script_name = unquote(environ.get('SCRIPT_NAME', ''))
        offset = request_uri.startswith(script_name) and len(environ['SCRIPT_NAME']) or 0
        environ['PATH_INFO'] = request_uri[offset:].split('?', 1)[0]
        return self.app(environ, start_response)
application = get_wsgi_application()
application = PassengerPathInfoFix(application)
-
Step 10:
Open settings.py and add your domain name to ALLOWED_HOSTS.
Do not include http:// or https:// inside ALLOWED_HOSTS.
For example:
ALLOWED_HOSTS = ['example.com','www.example.com']
-
Step 11 | Preparing the Database:
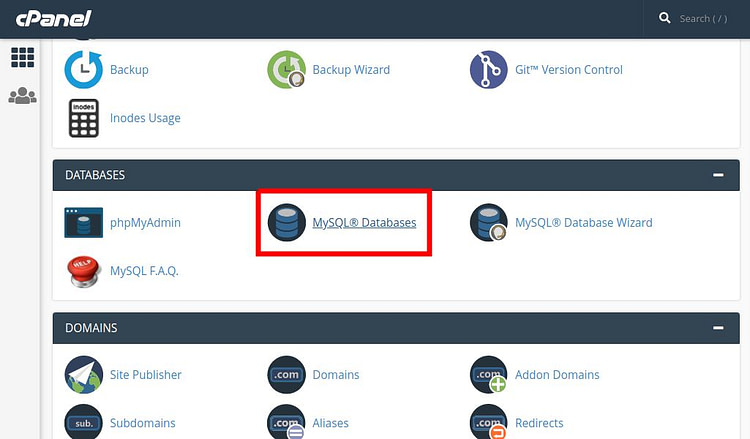
Return to the main cPanel page and choose MySQL Databases.
-
Step 12:
Create a new database.
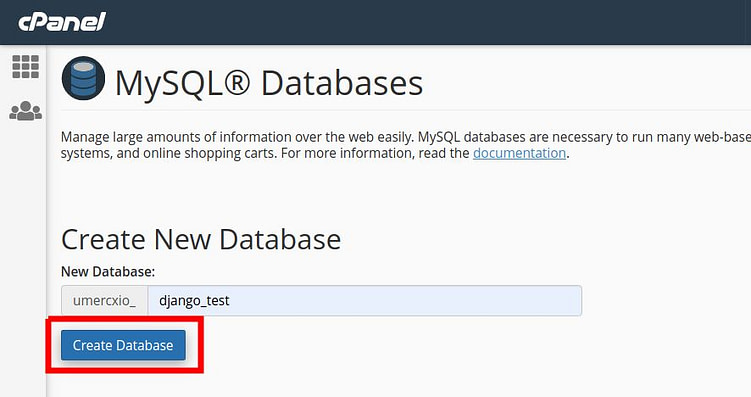
Create a new database user. Save the user's password because you will need it in the following steps.
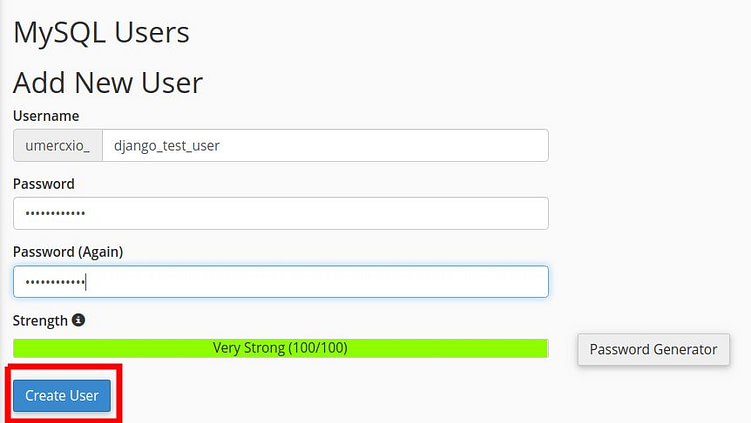
Then connect the user to the database.
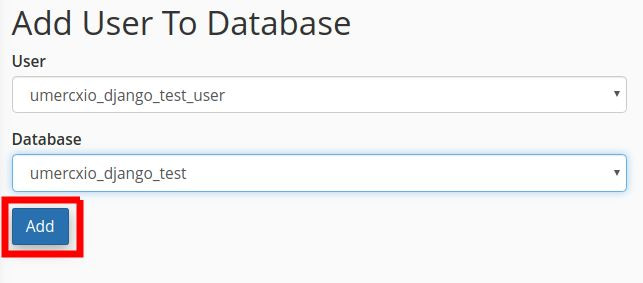
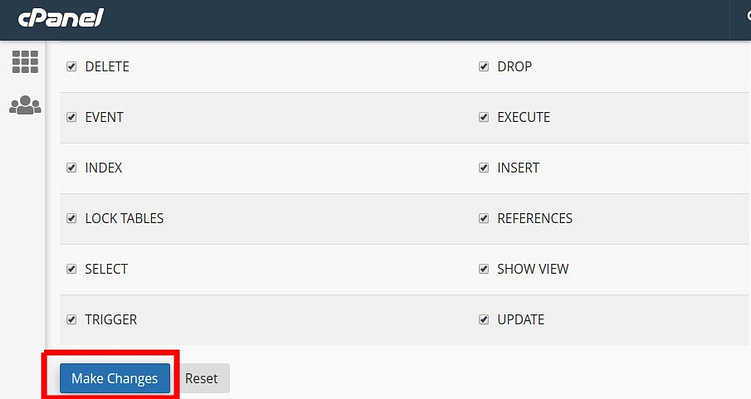
After that, grant all required privileges to this user.
-
Step 13:
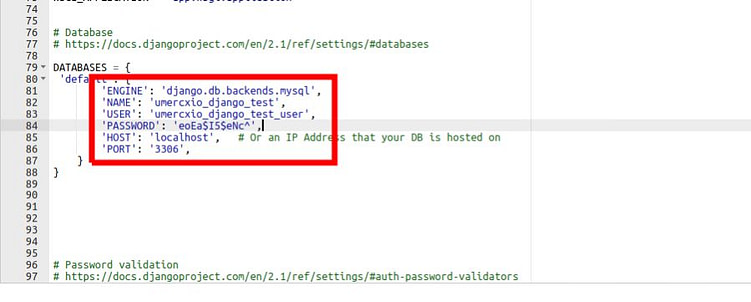
Open settings.py and update the database configuration.
Important:
Replace the database name, database username, and password with your real database information.
DATABASES = {
    'default': {
        'ENGINE': 'django.db.backends.mysql',
        'NAME': 'yourusername_db',
        'USER': 'yourusername_db_user',
        'PASSWORD': 'pass',
        'HOST': 'localhost',
        'PORT': '3306',
    }
}
-
Step 14:
Open the __init__.py file and, if your setup requires PyMySQL, add the following code:
import pymysql

pymysql.install_as_MySQLdb()
-
Step 15:
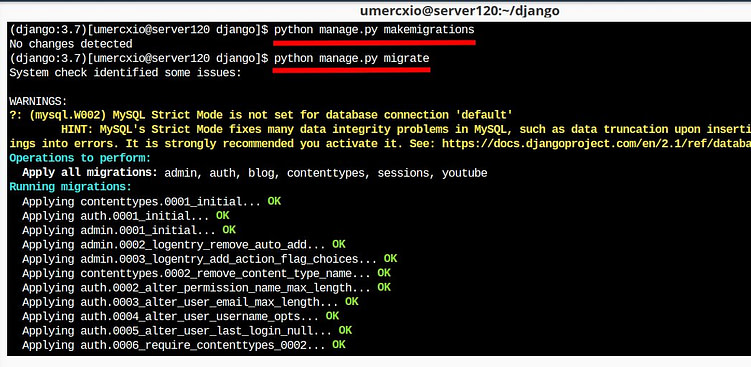
Return to Terminal, activate the Python environment as you did earlier, and run the following commands:
python manage.py makemigrations
python manage.py migrate
* Note: Sometimes you also need to add these commands:
python manage.py makemigrations app_name ( your app folder name that contain views , models etc.. )
python manage.py migrate app_name ( your app folder name that contain views , models etc.. )
You should also create a superuser so you can access the Django admin panel. Run:
python manage.py createsuperuser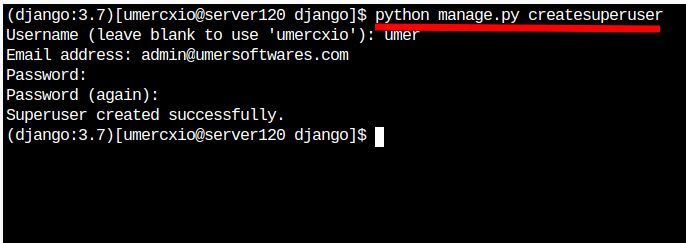
Final Step | Configure Static, Template, and Media Paths
Open File Manager from the main cPanel page.
Move your static, template, and media files into the public_html directory ( or the folder its name domain name ) if that is how your hosting environment is configured.
Then update the paths inside settings.py as required by your hosting setup.
TEMPLATE_DIR = os.path.join('/home/YourNameInHost/public_html/templates')
# media dir
MEDIA_URL = '/media/'
MEDIA_ROOT = os.path.join('/home/YourNameInHost/public_html/media')
STATIC_URL = '/static/'
STATIC_ROOT = os.path.join('/home/YourNameInHost/public_html/static')
You should also disable debug mode in production:
DEBUG = False
template
TEMPLATES = [
    {
        'BACKEND': 'django.template.backends.django.DjangoTemplates',
        'DIRS': [TEMPLATE_DIR,],
        'APP_DIRS': True,
        'OPTIONS': {
            'context_processors': [
                'django.template.context_processors.debug',
                'django.template.context_processors.request',
                'django.template.context_processors.media',
                'django.contrib.auth.context_processors.auth',
                'django.contrib.messages.context_processors.messages',
                'itsme_core.context_processors.site_settings',
            ],
        },
    },
]
Return to Terminal, activate your environment, and run:
python manage.py collectstatic
Finally, return to the main cPanel page and open:
Setup Python App
Click the restart button as shown in the image. If everything is configured correctly, the website should now run normally.
Congratulations! Your Website Has Now Been Uploaded Successfully
* If you run into an error, search for the exact error message and check the Django and hosting documentation.
In the end, this was a comprehensive introduction to Django and its advantages. There are also many other web frameworks and programming languages available for building websites, including PHP-based frameworks and other alternatives that compete with Django.
Thank you for reading the article. If you have a question or note, feel free to ask us in comment section.
Source https://qoqotech.online/Technology/how-to-develop-websites-using-python-and-django


Comments 0
Be the first to comment!